


E-44
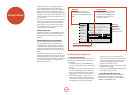
Out 1 & 2 Resolution – is setting controls the
output resolution when both HDMI outputs are used
simultaneously. is setting is only valid if Output
Switching is set to Output 1 & 2.
< e dropdown list shows all the resolutions that the
video processor can output. Resolutions that are
not supported by the connected display devices are
greyed out and cannot be selected.
< Best: sets the HDMI output to be the highest
common resolution that is supported by both
display devices.
Out 1 & 2 Frame Rate – is setting controls the
output frame rate when both HDMI outputs are used
simultaneously. is setting is only valid if Output
Switching is set to Output 1 & 2.
< e dropdown list shows all the frame rates that the
video processor can output. Frame rates that are
not supported by the connected display devices at
the above resolution are greyed out and cannot be
selected.
< Auto: sets the HDMI output to be the highest
preferred common frame rate that is supported by
both display devices for the above resolution.
<Follow Input forces the
OUT 1 & 2 frame rate to
the same as the input frame rate, regardless of the
reported capabilities of the display device.
Lipsync 1 & 2 – (Information only) Displays how much
lip sync is automatically applied to HDMI outputs
OUT 1
and OUT 2 simultaneously to compensate for video
processing delays in the attached display devices. Not all
display devices support this function.
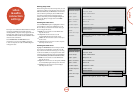
Mode
Lists the decode and downmix options you wish to
include when cycling through the options on the MODE
button. Settings are Yes or No. e list is divided into
two sections depending on the source audio type. See
section ‘Multichannel source modes’ on page 47 for
more information on each processing a decoding mode.
ese settings are applied to all audio inputs and are
stored in memory and recalled each time the unit is
powered up.
For Stereo sources:
Dolby ProLogic –
Dolby PLIIx Movie –
Dolby PLIIx Music –
Dolby PLIIx Matrix –
Dolby PLIIx Game –
Neo:6 Cinema –
Neo:6 Music –
e rst section, ‘Stereo sources’ is the list of processing
modes you wish to make available for stereo signals
(analogue stereo, digital PCM stereo, Dolby 2.0, DTS
2.0, etc). When a stereo signal is applied, each press of
the
MODE button cycles through the processing modes
you have enabled in the ‘Stereo sources’ section. e
unprocessed Stereo option is always available for stereo
signals therefore it is not shown in the list.
For Multichannel sources:
Stereo Downmix –
Dolby Digital EX –
Dolby PLIIx Movie –
Dolby PLIIx Music –
e second section, ‘Multichannel sources’ is the list
of processing modes you wish to make available for
multichannel digital signals (any Dolby or DTS digital
stream that has more channels than stereo 2.0). When a
multichannel digital signal is applied, each press of the
MODE button cycles through the processing modes you
have enabled in the ‘Multichannel sources’ section.
Zone Settings
Lists the volume and control settings for Zone2 and
Zone3 (Zone 3 available with AVR600/AV888 only).
ese settings are applied to all audio inputs and are
stored in memory and recalled each time the unit is
powered up.
Z2 Audio Input – Selects the analogue audio to be
routed to Zone2.
Z2 Video Output – Selects the analogue video to be
routed to Zone2 for the current audio input.
Zone2 Volume – e current volume in Zone2.
Zone2 Max. Vol – Limits the maximum volume setting
the system can be turned up to in the Zone2. is is a
useful feature to prevent accidental overdriving of low
power-handling speakers, for example.
Zone2 Fixed Vol – e Zone2 volume control can be
locked at the current value for use with an external
amplier with its own volume control in Zone2.
Zone2 Max On Vol – Limits the maximum volume the
system operates in the Zone2 when it is switched on
or comes out of Standby. e system comes on at this
volume if the last used (possibly very loud) volume
exceeds this value.
Zone3 Volume – e current volume in Zone3.
Zone3 Max. Vol – Limits the maximum volume setting
the system can be turned up to in the Zone3. is is a
useful feature to prevent accidental overdriving of low
power-handling speakers (for example).
Zone3 Fixed Vol – e Zone3 volume control can be
locked at the current value for use with an external
amplier with its own volume control in Zone3.
Zone3 Max On Vol – Limits the maximum volume the
system operates in the Zone3 when it is switched on
or comes out of Standby. e system comes on at this
volume if the last used (possibly very loud) volume
exceeds this value.
Standby – When a Standby command is received by an
infra-red eye in Zone2, this setting controls which parts
of the AVR500, AVR600 or AV888 to turn on and o:
When Local Only, the Standby IR command only aects
the zone it was received in (Zone2 or Zone3).
When All O, the Standby IR command aects the
entire system in all zones.
Network
e AVR600 and AV888 are tted with a network audio
client (optional for the AVR500) which is capable of
playing internet radio stations as well as stored music
on a network storage device such as a PC, or on a USB
ash drive.
Use DHCP – Select if your network uses DHCP
<No: To assign a xed IP address manually.
<Yes: To use network parameters given by the DHCP
server.
MAC address – (Information only) e unique address
of the network card in your AVR500/AVR600/AV888.
IP Address – If not using DHCP, enter the IP address
you have assigned to the AVR500/AVR600/AV888 for
your network.
Subnet Mask – If not using DHCP, enter the subnet
mask for the AVR500/AVR600/AV888 on your network.
Gateway – If not using DHCP, enter the IP address of
the router the AVR500/AVR600/AV888 is connected to.
Primary DNS – If not using DHCP, enter the Primary
DNS IP address of your internet service provider.
Alternate DNS – If not using DHCP, enter the Secondary
DNS IP address of your internet service provider.
Use Proxy – Select if you connect to the network via a
Proxy Server.
<No: If you connect directly onto the network.
<Yes: If you connect to the network via a Proxy
Server.
Proxy Address – If connecting via a Proxy Server, enter
its IP address.
Proxy Port – If connecting via a Proxy Server, enter the
port number to which the Proxy responds.