


AVR350
16
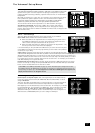
5 – Level settings
The relative sensitivity of different speakers can lead to some speakers sounding
disproportionately loud or quiet, relative to others in the system. The level settings of
your AVR350 can help to address this inbalance.
It is important to calibrate the speakers correctly to achieve an accurately centred sound
stage. If possible, we recommend you use a sound pressure level meter (SPL meter)
to perform this part of the set-up as it is difcult to judge the levels accurately by ear
alone.
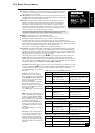
Test Tone Cycle
<
MANUAL is best for setting up with a SPL meter as the test tone will not change
to the next speaker until instructed by you. Pink noise is emitted by the
highlighted speaker; when you wish to measure a different speaker, move the
highlight to the new speaker.
<
AUTO is best for setting up by ear. In this state, the test tone changes automatically between
speakers after a two second burst of sound.
On rst installation, watch the OSD display as you cycle through the available speakers with the test
tone. Check that the speaker generating the sound corresponds to that indicated on the OSD. If there is
a discrepancy then check and correct the system cabling before proceeding further.
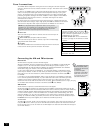
To calibrate the speakers with a SPL meter, place the meter at ear level with the microphone pointing
towards the ceiling, when seated in the usual listening position. (You will need to set the meter to ‘C’‚
setting with a ‘slow’‚ response and to read 75dB SPL at the centre of the scale.) If you do not have a SPL
meter, simply set the front left speaker to 0dB on the menu and then match all the other speakers to
this level.
Each speaker can be ne-tuned by 1dB increments to ±10dB. The output from each speaker needs to be
adjusted to the 75dB SPL sound level. No adjustments can be made for a speaker that is not selected in
the previous ‘Speaker Sizes’ menu.
Note that inserting headphones into the front panel of the AVR350 will cause all test-tones to be muted
(including the headphone output).
Note: If you are using a 6.1 speaker conguration (a single surround back speaker), we recommend
connecting the surround back speaker to the surround back left channel of the AVR350.
In this case, the level of the connected surround back channel should be increased by 3dB (i.e., the
SPL meter should show a response of 78dB for this channel).
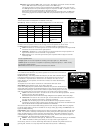
6 – EX Settings
Surr. EX: This can either be set to AUTO or MANUAL and is applicable only when playing
‘Surround EX’-encoded material.
<
AUTO DD EX: The AVR350 will switch automatically to ‘Surround EX’ decoding
when suitably encoded material is detected (this can be temporarily overridden
by pressing the MODE button on the remote control).
<
AUTO PLIIX: The AVR350 will switch automatically to ‘Pro Logic IIx Movie’
decoding when suitably encoded material is detected (this can be temporarily
overridden by pressing the MODE button on the remote control).
<
MANUAL: The AVR350 will not select Surround EX automatically. It can however
be selected manually by pressing the MODE button.
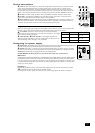
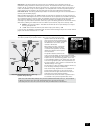
Use Channels 6+7 for
Choose one from:
<
DOLBY SURR EX: ‘Dolby Surround EX’ provides two additional rear channels from 5.1 channel
EX-encoded material. This is intended to give better effects steering. In this mode, amplier
channels 6 and 7 are used to drive the EX speakers.
<
ZONE 2: In this mode, amplier channels 6 and 7 are used to provide speaker level output for
use in Zone 2.
<
BIAMP L+R: The amplier channel 6 and 7 are used to provide a second amplied output of the
left and right channels. This allows you to bi-amplify your front speakers, which should give an
improvement in the sound quality of these channels.
If you would like to do this, please refer to page 26 for further information.
Note: Changing this setting will require you to change the conguration of the cables connected your
speakers.