


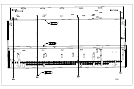


1. Assemble the damping plate to chassis floor. Screw
through from underneath the chassis and thoroughly degrease the
chassis floor before assembling the damping plate. See FIG1.
Part No. Description Qty
E816CH Chassis 1
E873MC Damping Plate 1
HE6V06B Self-tapping No6x6mm Pan Torx-Slot
Steel Zinc-Plate Black
4
2. Assemble the feet to the chassis. Screw through the
chassis floor into the foot. Stick the bumpon foot onto the base of
turned foot. See FIG2.
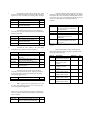
Part No. Description Qty
E935MC Turned Foot 4
HA3V06A Screw Machine M3x6mm Pan Torx
Steel Zinc-Plate Clear
8
F225 Black ‘Bumpon’ Foot 4
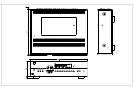
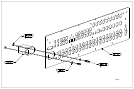
3. Assemble the power socket to rear panel before
assembling the rear panel to the chassis. See FIG3.
Part No. Description Qty
E040AY Rear Panel Assembly 1
8A016 8A016 IEC Inlet with EMI Filter
YB10T1
1
HA3V10B Screw Machine M3x10mm Pan Torx-
Slot Steel Zinc-Plate Black
2
HJ3A00F Nut Nyloc M3 Steel Zinc-Plate Clear 2
HL3IB Washer Internal Shakeproof M3 Steel
Zinc-Plate Black
2
4. Assemble power loom to IEC power inlet before
assembling the rear panel to the chassis. The live connection is
the right hand spade as viewed from behind (spade terminals)
with the earth spade at the top.
Part No. Description Qty
L939CA AV8 power loom 1
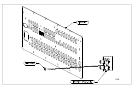
5. N.B. If a phono card is to be fitted then you do not fit
the “Aux” snap-off board at this stage, move to step 6. See step
23 for fitting the Phono upgrade kit.
Fit the “Aux” input snap-off board (snap-off from Audio board,
L921AY) to the rear panel before assembling the rear panel to the
chassis. See FIG4.
Part No. Description Qty
HF4V09B Screw Self-Tapping-SEMS No4x9mm
Pan Torx-Slot Steel Zinc-Plate Black
1
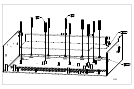
6. Assemble 5x H038 to audio board, L921AY, using 5x
HA3V06A in the holes running along the EMC can, only then fit
the board into the chassis with the other 5x H039 pillars (do not fit
rear panel). Loosely screw all the pillars through the pcb into the
chassis, once these pillars are in place tighten them all.
See FIG5.
Part No. Description Qty
HF4V09B Screw Self-Tapping-SEMS No4x9mm
Pan Torx-Slot Steel Zinc-Plate Black
(into EMC shield)
3
H038 38 ff pillars 5
H039 38 mf pillars 5
HA3V06A Screw Machine M3x6mm Pan Torx
Steel Zinc-Plate Clear (from
underneath)
5
HF4V09B Screw Self-Tapping-SEMS No4x9mm
Pan Torx-Slot Steel Zinc-Plate Black
(into sockets)
19
NB. Screws in italics are to be used when rear panel is fitted in
step 18.
7. Once the audio board is in place, fit the following
cables to the audio board. Ensure the cables, especially the flex
foil, are the correct way round.
Part No. Description Reference Qty
L925CA 8-way AMP CT from
audio to snap-off 280mm
SK901 1
L927CA 6-way AMP CT from
audio to horiz power
100mm
SK801 1
L930CA 5-way AMP CT from
headphone to audio
250mm
SK917 1
L922CA 22-way foil cable from
digital to audio 100mm
SK916 1
L933CA 5-way AMP CT from
digital to audio 100mm
SK915 1
L923CA 8-way AMP CT from
digital to audio 120mm
SK913 1
L923CA 8-way AMP CT from
digital to audio 120mm
SK914 1