


DT91
E-4
English
DT91
E-5
Installation
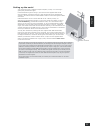
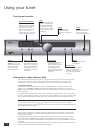
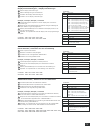
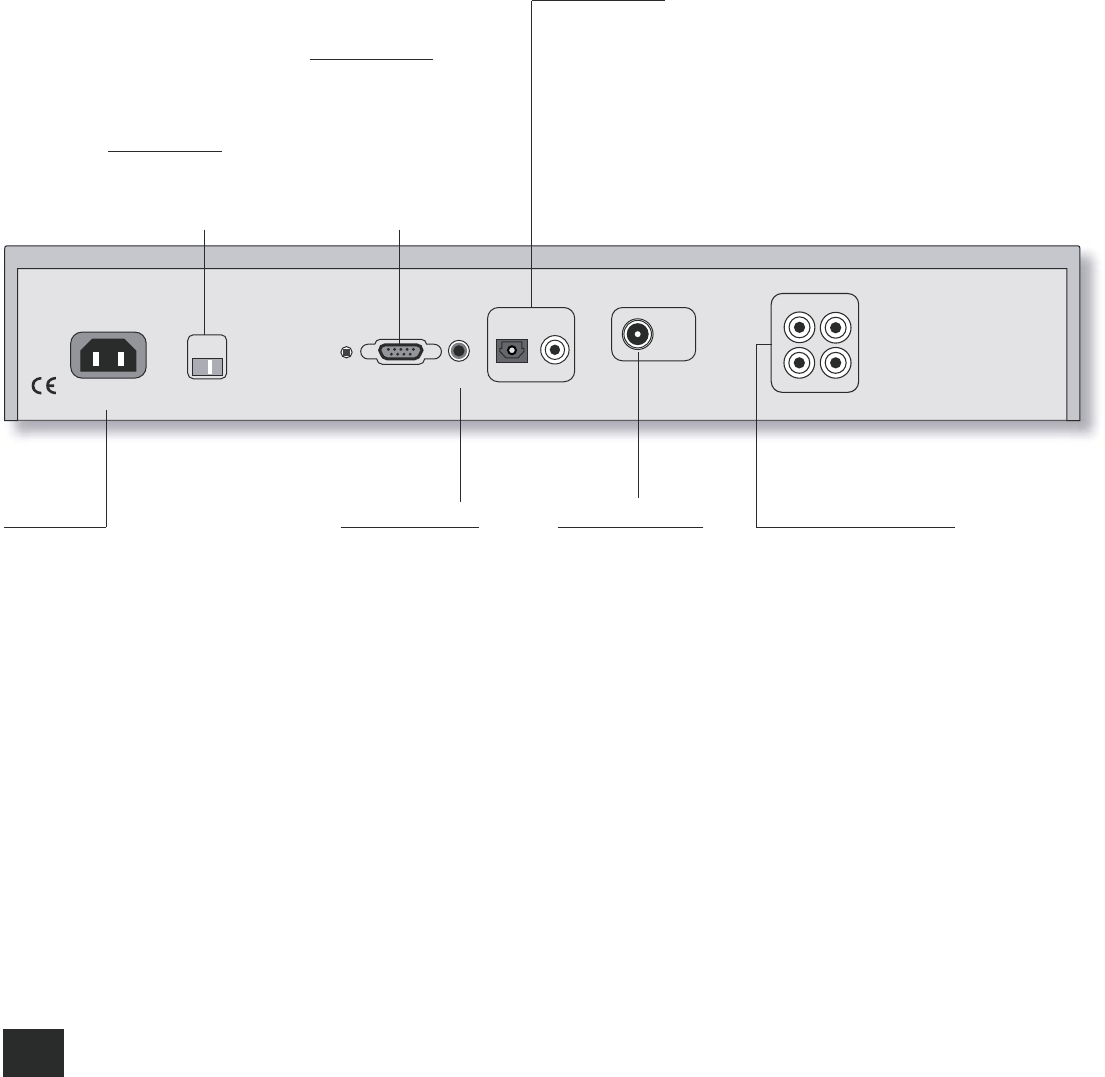
POWER INLET
115/230V
AERIAL
INPUT
L
R
AUDIO OUTPUTS
1
2
COAX
OPTICAL
DIGITAL OUT
REMOTE
IN
PROGRAM RS232
SUPPLY
VOLTAGE
115V
230V
Positioning the unit
n Place the DT91 on a level, rm, surface, avoiding direct sunlight and sources of heat or damp.
n Avoid placing the DT91 on top of a power ampli er or other source of heat.
n The DT91 may run warm during normal operation, so avoid placing the DT91 in an enclosed
space such as a bookcase or closed cabinet unless there is good ventilation.
n Make sure the remote-control receiver in the centre of the front panel display is unobstructed,
otherwise remote-control will be unreliable. If line-of-sight is impractical, a remote-control
repeater can be used with the rear panel connector. (see below).
n Avoid placing a record deck on top of this unit. Record decks are very sensitive to the noise
generated by mains power supplies which will be heard as ‘hum’ if the record deck is too close.
Connecting up
Analogue audio outputs
Two pairs of stereo analogue outputs are
provided by the DT91, both of which provide
the same signals. Connect one pair of these
outputs to your ampli er using a suitable
stereo phono cable. The second output pair
may be connected to some other audio
device, as desired, such as a cassette deck.
Note that interconnecting cables are not
supplied with this tuner. We recommend
the use of high-quality screened cables,
since inferior-quality cables will degrade
the overall quality of your system. Use
only cables that are designed for an audio
application as other cables will have
different impedance characteristics that will
degrade the performance of your system
(for example, do not use cabling intended
for video use to carry audio signals).
All cables should be kept as short as is
practically possible.
It is good practice when connecting your
equipment to make sure that the mains
power-supply cabling is kept as far away as
possible from your audio cables. This avoids
unwanted noise in the audio signals.
Digital outputs
The DT91 is tted with both optical and co-axial
digital audio outputs; the two carry the same
information at all times. If you wish, these can
be connected to an external DAC or your AV
receiver, which may enhance the nal audio quality.
Alternatively, they can also be used to connect this
tuner to a digital recording device (such as a CD-R
or Minidisc recorder) for direct recording.
When listening to a DAB radio station, these outputs
carry audio with a sample rate of 48kHz; when an
FM station is being received, the sample rate is
32kHz.
Remote control in
If you are using this tuner
with an ampli er that also
features a remote bus
(such as the Arcam DiVA
AVR300) you can connect
the REMOTE OUT of the
ampli er to the REMOTE IN
of the tuner using a 3.5mm
jack lead.
This allows the tuner to be
positioned out of sight while
still offering remote control,
since commands are passed
through the ampli er. It
can also be used to route
control signals for multi-
room use.
The remote control input
requires a mono 3.5mm
jack, with the tip active and
the sleeve grounded.
The remote control signals
must be in modulated RC5
format, with a voltage level
of between 5V and 12V.
Aerial input socket
The coaxial cable from
the aerial should be tted
with a 50Ω F-type (screw)
connector. Connect this to
the aerial socket on the
back of this tuner, pushing
the pin into the centre of
the socket, then screwing
on the cover to lock in
place.
Take care not to over-
tighten the F-connector
( nger tighten only – do
not use tools as this may
damage the circuit board
behind the connector).
See ‘Setting up the aerial’
for further information on
the aerial type to use.
Mains lead
The appliance is normally supplied with
a moulded mains plug already tted to
the lead. If for any reason the plug needs
to be removed, it must be disposed of
immediately and securely, as it is a potential
shock hazard when inserted into the mains
socket.
Check that the plug supplied with the unit
ts your supply and that your mains supply
voltage agrees with the voltage setting
(115V or 230V) indicated on the rear panel
of the unit.
If your mains supply voltage or mains plug
is different, or you require a new lead,
please consult your Arcam dealer.
PLUGGING-IN
Push the plug (IEC line socket) of the power
cable supplied with the unit into the socket
(POWER INLET) in the back of the unit.
Make sure it is pushed in rmly.
RS232 interface
The serial interface
is available for
controlling the DT91
from a computer
or other controller.
The remote control
protocol is described
in the Appendix to this
handbook.
Supply voltage
Move the slider to 115V
or 230V, depending
on the mains supply
voltage in your area.